The consequences of that blind spot can be severe. In one documented case involving a 1.2 million gallon anaerobic digester, volatile solids reduction had dropped below 25% and daily biogas production had fallen by 20% — all because accumulated sludge had gone unaddressed for over four years.
A routine sludge survey prevents exactly that kind of crisis. This guide walks through the complete process: what equipment you need, how to set up a measurement grid, which detection methods work best, how to calculate sludge volume, and what your results actually mean for compliance and operations.
Key Takeaways
- A sludge survey measures depth and volume across a grid of points using an infrared sensor, disk-on-rope, or Sludge Judge
- NRCS Code 359 and most state permits require annual surveys after five years of operation
- Sludge filling more than 50% of treatment volume triggers a mandatory Plan of Action in most jurisdictions
- Accurate results depend on a properly spaced grid, staying clear of embankment slopes, and choosing the right measurement tool for your lagoon's solids content
- Critical buildup doesn't mean shutting down — removal options are available that keep your lagoon fully operational
Why Lagoon Sludge Surveys Matter
Sludge builds up as settled manure solids, microbial cells, inorganic debris, and organic material accumulate on the lagoon floor over time. That layer thickens every year — consuming active liquid treatment volume and, in covered digesters, the gas-producing zone.
A 14-year study of swine lagoons published in ASABE Transactions found that accumulation accelerates sharply once sludge occupies roughly one-third of lagoon volume. That's the trigger point operators often miss because they aren't measuring.
Regulatory Requirements
The compliance picture is specific. NRCS Code 359 requires O&M plans to track sludge accumulation and removal. North Carolina DEQ goes further — requiring annual sludge surveys for all permitted animal facilities, with a Plan of Action submitted within 90 days if sludge exceeds 50% of planned treatment volume. Compliance with NRCS Standard 359 must be achieved within two years of that original survey.
North Carolina's rules are among the most detailed, but other states follow comparable structures. Check current requirements with your state agency or NRCS office, since permit conditions vary by jurisdiction.
Operational and Financial Stakes
Neglected surveys create a predictable chain of expensive problems:
- Treatment efficiency drops as active volume shrinks
- Biogas output falls in covered lagoon and digester applications
- Cleanout can no longer be deferred, forcing unplanned shutdowns
- Compliance failures trigger enforcement actions and mandatory remediation timelines
A routine annual survey costs far less than any of these outcomes.
What You Need Before You Start
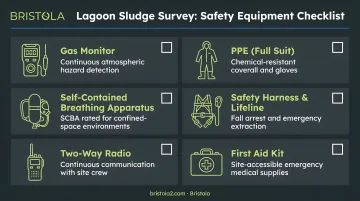
Personnel and Safety Equipment
Lagoon surveys carry real hazards. Do not launch without the following in place:
- Minimum three people — two in the boat, one designated shore-based safety monitor
- Flat-bottom or jon boat with motor and paddles
- PFDs for all personnel within the lagoon berm at all times
- Throwable flotation device with rope accessible to the shore monitor
- Emergency egress plan reviewed by all personnel before launch
- Standard PPE: boots and gloves to minimize manure contact
Survey and Measurement Equipment
| Item | Purpose |
|---|---|
| Infrared sludge interface detector (e.g., Raven SID-20200 or Markland Sludge Gun) | Detecting top of sludge layer |
| Disk-on-rope device | Backup sludge detection method |
| Sludge Judge / clear plastic pipe | Detection + optional sludge sampling |
| Solid metered rod or pole (½–1 inch diameter, marked in inches or tenths of feet) | Measuring depth to lagoon bottom |
| Handheld GPS unit or wooden stakes | Grid navigation |
| Waterproof field notebook or data sheets | Recording measurements |
Preconditions Before Launch
Check weather before you start. Winds above 12–15 mph introduce measurement error and boat instability. Postpone if conditions are marginal.
Do not conduct surveys during temperature inversion conditions. When warm and cold air layers trap gases near the surface, ammonia, methane, and hydrogen sulfide can concentrate at dangerous levels directly above the lagoon. NIOSH sets the IDLH for hydrogen sulfide at 100 ppm, and OSHA's ceiling limit is 20 ppm, concentrations that can be reached quickly in high-solids first-stage lagoons. If gas hazard conditions are suspected, postpone.
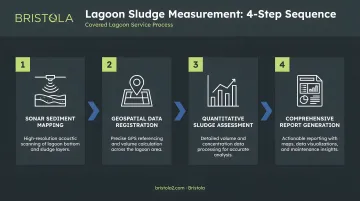
How to Conduct a Lagoon Sludge Survey: Step by Step
Before you push off from shore, understand what you're measuring. At each grid point, you'll record two depths: from the liquid surface to the top of the sludge layer, and from the liquid surface to the lagoon bottom. The difference between those two readings is the sludge thickness at that location.
Setting Up Your Measurement Grid
Grid density determines whether your results are statistically meaningful or just a rough guess.
Requirements:
- Minimum 6 measurement points per acre on a uniform grid
- Maximum of 24 points regardless of lagoon size
- For lagoons smaller than 1.33 acres: minimum of 8 points
Formula: Multiply lagoon acreage (length × width at inside top of bank ÷ 43,560) by 6, then round to a number that produces a uniform grid.
Sketch the lagoon and overlay the grid, numbering each intersection. Use GPS waypoints or shore-based survey stakes to navigate to each point on the water.
Critical exclusion zone: Never take measurements over embankment slopes. A lagoon 12 feet deep with a 3:1 side slope has a slope extending 36 feet into the water — all measurement points must fall beyond that distance from the inside top of the bank.
Measuring over slopes artificially inflates average sludge thickness and produces compliance calculations you can't rely on.
Taking Measurements at Each Grid Point
Follow this sequence at every point. Changing the order contaminates your readings:
- Measure sludge depth first using your chosen detection method (see next section). Record the depth to the top of the sludge layer.
- Push the metered pole vertically through the sludge to the lagoon bottom (soil contact) without pressing into the soil. Record this depth.
- Subtract sludge top depth from bottom depth to get sludge thickness at that point.
- Record field observations: odor levels, floating sludge, debris, bank erosion, or anomalies.
Always detect the sludge surface before inserting the pole — the pole disturbs the sludge layer and can make detection unreliable if done afterward.
Once all grid points are recorded, reference the present liquid level to a permanent benchmark marker and note the Maximum Liquid Level from the lagoon gauge. You'll need both values to calculate the Permanent Liquid Treatment Zone.
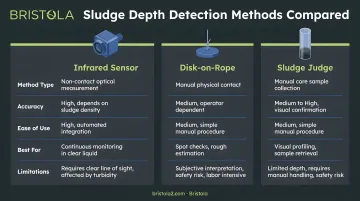
Methods for Measuring Sludge Depth
Three methods are recommended for detecting the sludge-liquid interface. "Feel" methods using a capped pipe are not — sludge density is close enough to the surrounding liquid that resistance alone is unreliable at the interface.
| Method | Cost (USD) | Best For | Limitation |
|---|---|---|---|
| Infrared Sensor | $1,180–$1,305 | Standard conditions | May false-trigger in high-solids lagoons |
| Disk-on-Rope | Minimal | High-solids backup | Slightly slower to deploy |
| Sludge Judge | $150–$171 | Depth + sampling | Requires visual observation |
Method 1: Infrared Sensor
An infrared sensor is lowered into the lagoon and emits an audible signal when it detects the increased density of the sludge layer. Instruments such as the Raven SID-20200 and Markland Sludge Gun have cables marked in feet or tenths of feet for direct depth reading.
To use:
- Lower the sensor slowly, keeping the cable vertical
- When the alarm sounds, read the depth from the cable markings
- Record the value
Note: In lagoons with very high suspended solids, the sensor may trigger at the liquid surface. If this happens, switch to the disk-on-rope method.
Cost: Approximately $1,180–$1,305 depending on cable length. For most lagoon conditions, this is the quickest method to deploy and read.
Method 2: Disk-on-Rope
A weighted PVC or Lexan disk (8–12 inches diameter, ¼-inch thick) is lowered on a marked, non-elastic line. When the rope goes slack, the disk has settled on the sludge surface — no electronics required.
To use:
- Attach a marked, non-elastic rope to the disk at two to four symmetrical points to maintain horizontal orientation
- Lower the disk slowly
- Watch the rope for the moment it goes slack — disk has settled on the sludge
- Read the depth marking at the liquid surface
This is the most reliable backup when infrared sensors produce false readings in high-solids conditions, and equipment cost is minimal.
Method 3: Sludge Judge / Clear Plastic Pipe
A Sludge Judge is a clear-walled pipe with a ball valve at the bottom. As it's lowered, the internal liquid column drops slightly below the outside liquid level when it contacts the sludge surface — a visible cue that doesn't depend on sound or feel.
To use:
- Lower the Sludge Judge slowly and vertically
- Watch the internal liquid column — when it drops slightly, note the depth
- Confirm sludge contact by checking for 1–2 inches of sludge at the bottom of the pipe
Cost: Approximately $150–$171. At that price point, it's also the only method that doubles as a sampling tool — capturing sludge directly for nutrient analysis alongside the depth reading.
Once you have depth readings from each sampling point, the next step is plotting them into a sludge volume map across the lagoon.
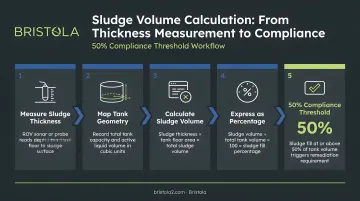
How to Calculate Sludge Volume and Interpret Your Results
The Three Core Calculations
1. Sludge thickness at each point:
Bottom depth − sludge top depth = sludge thickness
2. Average sludge layer thickness:
Sum of all sludge thickness readings ÷ number of measurement points
3. Estimated sludge volume (rectangular lagoons):
Average sludge thickness × lagoon surface area at the midpoint of the sludge layer
For irregular lagoons, convert total surface area to an equivalent square shape before calculating.
Comparing Against Your Treatment Zone
The Permanent Liquid Treatment Zone is the difference between the Minimum Liquid Level and the top of the sludge layer.
- If average sludge thickness ≤ Permanent Liquid Treatment Zone: The lagoon is within acceptable operating range. Store the data and schedule next year's survey.
- If sludge thickness exceeds the treatment zone: Proceed to volume ratio calculations.
The 50% Threshold
Calculate: sludge volume ÷ total treatment zone volume
If that ratio exceeds 0.50, regulatory requirements in most jurisdictions require submitting a Plan of Action within 90 days and achieving compliance within two years. This is a regulatory trigger — not a soft recommendation. Confirm specific requirements with your state environmental agency or NRCS office.
When Removal Is Required
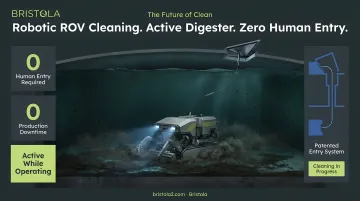
If survey results indicate intervention is needed, removal options range from conventional dredging (which typically requires taking the lagoon offline) to robotic systems that clean while the facility stays online.
For operators facing a covered lagoon or anaerobic digester, downtime and confined-space entry are the two biggest removal concerns. Bristola's zero-human-entry robotic cleaning system addresses both: a submersible ROV enters through a patented equalization chamber, removes accumulated sludge, and routes it through a flexible hose to the operator's chosen processing point — all without taking the lagoon offline.
Comparing annual survey results against a documented baseline lets operators track accumulation rates, predict when removal will be needed, and budget ahead. Bristola's full-service monitoring system stores facility condition and performance data over time, so maintenance decisions are based on documented trends rather than guesswork.
Common Mistakes and Safety Precautions
Measurement Errors to Avoid
- Measuring over embankment slopes — produces artificially inflated sludge thickness readings and invalid compliance calculations
- Too few grid points — misses localized sludge peaks common in older lagoons; always meet the minimum density requirement
- Using a "feel" method — capped pipe resistance is unreliable at the sludge-liquid interface; use an approved detection method
- Skipping the field observation log — anomalous readings need context; document odors, floating sludge, debris, and erosion at each point
Documentation Errors
Failing to reference liquid level to a fixed benchmark makes year-over-year comparisons invalid. Not recording both Maximum and Minimum Liquid Levels also prevents accurate treatment zone calculations — both omissions can invalidate your compliance records entirely.
Documentation failures create compliance gaps, but physical hazards at the lagoon's edge can be far more immediate. Before any crew enters the berm, confirm the following.
Safety Checklist
- ✅ PFDs worn by all personnel within the lagoon berm — no exceptions
- ✅ Shore-based safety person with throw bag and charged phone present throughout
- ✅ Gas monitoring conducted before and during the survey
- ✅ Survey postponed if temperature inversion conditions are present
- ✅ Flat-bottom or jon boat used for stability
- ✅ Boots and gloves worn by all personnel
OSHA's manure storage safety guidance documents drowning, toxic gas, and oxygen-deficient atmosphere risks at liquid manure systems. Fatalities have occurred at facilities where these protocols were skipped or shortcuts were taken — the checklist above exists because each item on it has a documented consequence when ignored.
Conclusion
A sludge survey is a straightforward field task, but the data it generates drives every major lagoon management decision you'll make — from regulatory compliance filings to dredging contracts to biogas optimization planning.
Accuracy depends on consistent methodology: the right detection tool for your lagoon's conditions, a properly spaced grid, avoided slope zones, and referenced liquid levels. Annual surveys conducted systematically move operations from reactive crisis management to confident, data-driven planning.
When survey results indicate that removal is needed, knowing your sludge volume accurately determines whether you're looking at a scheduled maintenance project or an unplanned emergency. That difference can translate to hundreds of thousands of dollars in avoided dredging costs, regulatory penalties, and lost production time — which is why the survey itself is never just a paperwork exercise. For facilities where removal is confirmed, robotic cleaning systems that operate without draining the lagoon or halting production have become a practical alternative to traditional dredging.
Frequently Asked Questions
How often should a lagoon sludge survey be conducted?
NRCS Code 359 requires annual surveys after five years of operation, and most state permits (including North Carolina DEQ) require annual surveys from the date of permit issuance. Frequency may be reduced with regulatory approval if accumulation rates are demonstrated to be consistently slow.
What happens if sludge accumulation exceeds 50% of the treatment volume?
Most regulatory frameworks require the operator to submit a Plan of Action within 90 days, documenting sludge removal and waste utilization procedures. Compliance with NRCS Standard 359 must be achieved within two years of the original survey date.
How much does it cost to clean out a lagoon?
Costs vary based on lagoon size, sludge volume, access conditions, and removal method. Conventional dredging typically requires taking the lagoon offline, adding significant downtime costs. Robotic methods like those offered by Bristola can eliminate downtime entirely. Get multiple quotes based on actual survey volume data before committing to a removal approach.
What is the difference between a basic and a comprehensive sludge survey?
A basic survey uses manual tools and a grid to estimate volume, with accuracy varying by up to 50% depending on grid density. A comprehensive survey uses sonar profiling and professional analysis to produce precise volume maps — better suited for dredging contracts and regulatory documentation.
What tools do I need to perform a lagoon sludge survey?
Essential items include:
- Flat-bottom boat and PFDs
- Sludge depth detection device (infrared sensor, disk-on-rope, or Sludge Judge)
- Metered pole for bottom depth measurement
- GPS or stakes for grid navigation
- Data sheet for recording measurements at each grid point
Can a lagoon be cleaned without stopping operations?
Traditional dredging methods require draining or taking the lagoon offline. Robotic zero-human-entry systems (such as those offered by Bristola) clean active covered lagoons and digesters without halting production, protecting worker safety and operational continuity.